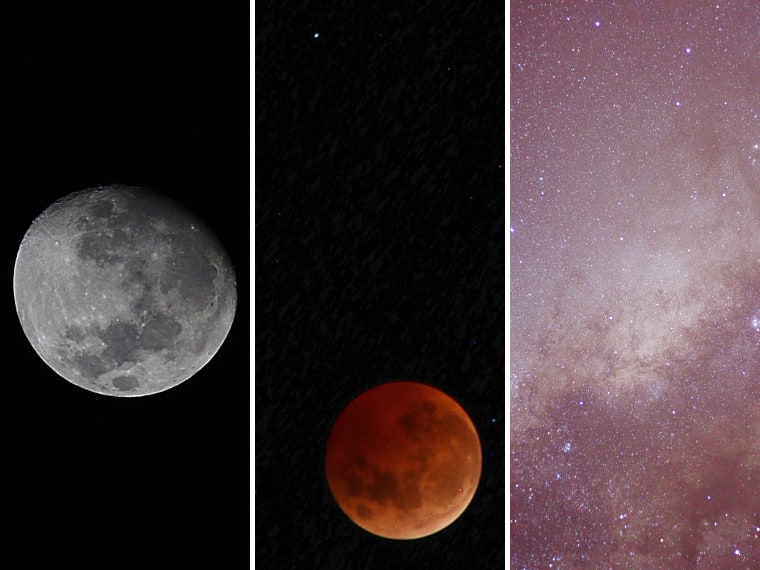
 Photography Tips: Astrophotography Astrophotography usually refers to the process of taking mostly technical photos of the night sky: of planets, stars, nebulae, clusters, comets, etc, but I'm going to extend it to more casual "arty" images as well. Not surprisingly, the big problem here is that the objects are very dim; often so dim you cannot see them without a telescope, or at least binoculars. They also are often small: you need some magnification to see Saturn properly, for example. This dimness means you have to get more light into the camera and there are three ways to do this: either get a bigger (in diameter, not length) lens, because the wider the lens is, the more light it can collect. The "speed" of a lens (which is just another way to say that it collects more light) is expressed as its "f number". This refers to the ratio beween the width and the length. Lower f numbers mean faster lenses, so f/1.2 is a lot faster than f/22. The problem is that greater diameter lenses are a lot harder to make, so they tend to be expensive (and I really do mean expensive; a "wide" and long lens can cost 5 figure sums easily) and because they are so much bigger they tend to be heavy and awkward to use. Often you mount the lens, not the camera, to the tripod! The second option is much cheaper: just use a more sensitive sensor. Cameras usually give you the option to change the sensitivity by setting the "ISO" rating. This is typically 100, 200, or 400, but many modern cameras can go much higher; up to 800, 1600, 3200, 6400, 12800, or even 25600. There might also be some mode which allows even greater sensitivity. As you might expect, it's not that easy; you never get something for nothing, right? As you increase the sensitivity you also increase the "noise" in the resulting image. Noise here means millions of little coloured dots where there shouldn't be any. These are bad enough in normal images, but when you are photographing stars, which are effectively also little coloured dots, it's an even bigger problem. Finally, there is the option of using a longer exposure time. Typical times for normal images are 1/1000 of a second to about 1/30 second. In astronomy, we often measure the exposure time in many seconds, or minutes, or even hours or days! Needless to say, these often require special techniques. Long exposures result in several issues: the camera must be kept still, and sensors tend to give lower quality images as the exposure time increases. There is one additional issue related to astrophotography too: because the Earth is rotating once per day on its axis, it looks like the sky is moving (that's why the Sun, Moon, and stars rise and set). You might not notice this normally, but for longer exposure, especially with high magnification, stars (and other objects) start looking like small arcs instead of dots. The best option here is to use all of these techniques. The image on the right above was taken with a 50 mm f/1.8 lens (which is quite fast), with the ISO sensitivity set to 1600, and an exposure time of 30 seconds. The stars don't look elongated here, because the camera was sitting on a telescope which was driven to keep up with the moving sky. It is often possible to get acceptable results with shorter times, like 30 seconds or blow, without driving (depending on the magnification, which magnifies the movement as well as the object), but much longer times or more magnification would definitely cause this problem. The middle image was 2 seconds at f/8 with ISO 400. I didn't use the fastest speed here because that makes focus so much more difficult. The Moon was very dim at this time, because it was being eclipsed. The blue "star" near the top is actually the planet Uranus, which is too dim to see without at least binoculars, so you can see that cameras really can reveal details which you might not normally see. Finally, there is a technique I haven't mentioned here, because it is quite specialised. It is called "image stacking" and it uses software to combine many shorter exposures of exactly the same object into one image that might have been taken with a single, long exposure. This bypasses many of the problems I mentioned, but its use is somewhat isolated to serious astrophotographers, and is beyond what I wanted to discuss here.
| ||||||||||||||||||||||||||||||||||