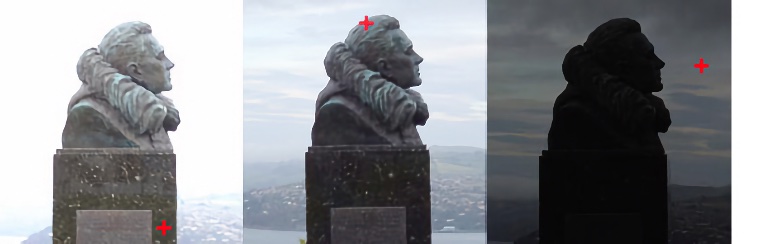
 Photography Tips: Spot Metering Metering refers to the process of measuring the light from the object being photographed and setting the shutter time and aperture accordingly (and on a digital maybe the effective ASA as well). Most cameras have a standard metering mode (often called matrix metering) which divides the frame into parts, measures the light from each part, and makes the exposure calculations based on the results. This usually works well, but in extreme lighting situations its better to make the decision yourself. One way to do this is by using spot metering. When you switch your camera to spot metering (unfortunately, more basic cameras probably won't have this feature) it makes the calculations for exposure based on one small spot in the middle of the frame (usually, some cameras have flexibility here). Depending on what sort of object is in the middle there will be different amounts of light coming from it and the exposure could be quite different. The problem is that what you want to meter on often isn't in the middle of the frame. To solve this problem you take the photo in two stages. Almost all cameras have a two stage shutter button. Press the shutter lightly and the camera focuses and meters (and will often do other things as well). Press the shutter fully and it takes the photo. So the trick is: first, point the camera so that the object you want to meter on is in the middle; next, press the shutter half way; third, while holding down the shutter half way re-frame the picture; finally, press the shutter fully. Most cameras will keep the exposure settings calculated at stage two above, even if you have moved the camera. The pictures at the top of the page were taken with the spot area on the red crosses, then re-framed to take the same photo. It makes a big difference! In the first picture the camera exposed the photo for the dark shadow which over-exposed the bright sky. In the last photo the exposure was correct for the sky but too short for the statue. The middle photo exposed on a brighter part of the statue, giving the most balanced result. Using a digital can be a big advantage here. Because you can see the photo on the screen before you take it, you know what the end result is going to be. If the result is too dark just repeat step one and two on a slightly darker area. If its too bright try a brighter area. It sounds complicated but its really easy after a bit of practice. I use this with conventional cameras as well but it involves a bit of guess work. There is one problem to be careful of here. Most cameras focus at the same time as they meter so either make sure you point at an object you want to focus on as well as meter on, or use a manual focus mode.
| ||||||||||||||||||||||||||||||||||