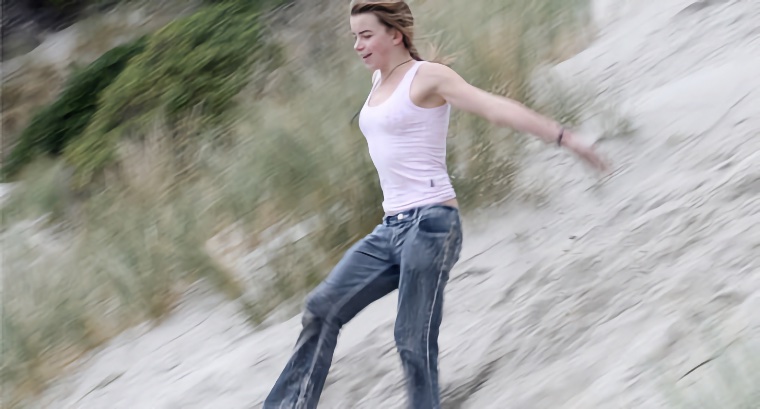
 Up to Photo Intro List Return to Previous Page Photography Tips: Movement There's nothing wrong with taking photos of stationary objects - you can spend time composing the scene and get some good results - but I think moving objects usually result in more dynamic and interesting photos. They are also a lot more challenging and often push the photographer's skills to the limit. In the photo above the subject was running down the sand hill and jumping around at the same time - a difficult subject to capture! The resulting photo shows the main subject fairly sharply and the background is blurred which creates the sense of motion. To create this effect I recommend this process... First, do a little bit of preparation before the subject arrives at the point where you want to take the photo. Just a few seconds is usually enough. Pre-focus on an object at the correct distance. Point at any stationary object at the same distance as the real subject which has good contrast, and hold down the shutter button half way. On most cameras this will lock the focus and meter while the button is still held half down. Now find the subject ahead of where you want to take the photo and continue tracking as the subject moves. Keep this as smooth as possible. If you feel confident enough you could do the focussing and metering at this point instead of doing it in the previous step. As the subject enters the point where you want to take the photo press the shutter completely to take the photo. Make sure you continue to follow the movement of the subject for a short time after the photo is taken. There are two things you can do to improve the whole process. First, put the camera in its fastest continuous shooting mode and take a series of photos starting just before the point you have chosen and ending just after that point. You should be able to take 2 to 5 photos per second depending on the camera. Later you can chose the best. Second you can create a greater blur effect by deliberately choosing a slower shutter speed. To do this do one or more of the following: set the ISO speed to as low as possible, set the programmed mode to slower speed, choose and AV or TV mode with a slow shutter. See my tips on modes for details.
| |||||||||||||||||||